Showing posts with label kidster. Show all posts

Friday, August 15, 2014

Pre-packed Toddler Lunches

This week I’m going to show you how to save a ton of time, and space in your fridge, by making your toddler lunches ahead of time.  This is great for stay at home moms or working moms who send their kids to preschool!
I purchased 10 three compartment containers at the dollar store but you can use whichever type of compartment container you like.
This is a great way to teach kids healthy eating habits, portion control and is especially great for toddlers who have developed the ‘pincer’ grasp.  I will often bring the empty container to a restaurant as a plate for Kidster to eat our food out of.  When it’s time to leave I can just put the lid on it and go!
This is a great way to pack up leftover dinner into pre-packed Kidster lunches/dinners. I also use a grease pencil / China marker to write on the front of the box what they are for so if Hubster is on his own with Kidster for a day he knows which box is which!
IMG_2451
The big section is for veggies, the smaller
sections for grains, meat, starches, and fruit.
These containers stack really well in the fridge and take up very little space.  I have one stack for lunches, and one for snacks!  When we go on a play date I can just reach in and grab a pre-packed box and I know Kidster and Little Man will have full bellies! The containers shown have frozen->steamed veggies, grilled sausage, and ranch style beans. The colorful containers really make eating fun and the food looks appetizing!  These are pretty great for a mom trying to get rid of the baby weight, too!  Just pack up a few Mom boxes with fruit, veggies, yogurt, or pasta.  We get hungry too!
Check back next Friday when I share my $10 Dollar Store shopping list for kid friendly fun!
What is YOUR favorite way to make yummy toddler meals?
~Lisa

Wednesday, August 13, 2014

Blueberry “Muffles”

I recently attempted to make a healthy version of blueberry muffins.  Blueberries are in season and on sale at our local market so I had quite a few.  Kidster isn’t a fan of blueberries by themselves so I figured I could bake them into muffins and she would eat them.  I used this Blueberry Muffin recipe with a few changes.  The muffins were not that great.  They didn’t go to waste but they weren’t super yummy.  My best friend Hetr ate a few when she came to visit but I’m sure it’s because she was just hungry!

Here is what you will need:

  • 2 cups sifted, all-purpose flour (I used a cup of flour and a cup of milled oats, I sifted the oats but put the big pieces in anyway, mistake.)
  • 4 tsp. baking powder
  • 1/2 tsp. salt
  • 1/2 cup sugar (I used honey instead, the muffins browned really fast!)
  • 1/4 cup soft butter or margarine (I used Trader Joe’s coconut oil, the muffins had a distinct coconut flavor…not sooo bad but not great)
  • 1 medium egg, lightly beaten
  • 1 cup milk
  • 1 cup fresh blueberries

I made the muffins as directed and had a bit of batter leftover.

20140730_223144463_iOS


Leftover batter.


20140730_223408832_iOS


I used my tablespoon cookie scoop to make four little muffles.


20140730_224426893_iOS


Pretty, good for you and delicious!


20140730_223705761_iOSKidster loved them and even asked for more!

So the next time you’re making muffins and have a bit leftover, toss it into the waffle iron and you’ll have muffles!

What’s YOUR favorite fruit muffin?

~Lisa

Tuesday, August 12, 2014

2 Ingredient Pancakes

I keep running across these ‘2 ingredient’ pancakes all over the internets.  Kidster is a huge fan of bananas but she really needs more protein in her breakfast to fill her up and keep her going!

It’s pretty simple:

  • One banana
  • Two eggs
  • splash of vanilla (my own preference)

Blend it all together.  I used my Baby Bullet Blender that I received as a gift for my baby shower.  I actually use it all the time. 

IMG_3194


Just blend away! You could also use a fork or whisk.


IMG_3195


I used a tablespoon for the first ‘pancake’.  Just to make sure the pancakes are the same size.


IMG_3196It was really hard to tell when the pancake was ‘ready’.
Even though the edges were browned
it still stuck to the pan. IMG_3197

After a few failed attempts at getting the pancake so stay a pancake shape I made it into a crepe style pancake instead.

IMG_3198

Success!

IMG_3199

I have to say that this pancake is not something that I will make instead of pancakes.  I will, however, use it as a crepe!  Next time I will put some jam or fruit in the middle.  Or maybe some cream cheese!

Check back next week when I make Meat Free Tuna Salad!

What is YOUR favorite pancake recipe?

~Lisa

Friday, August 8, 2014

Cardboard Crafts

Today’s Fun Kid Friday is brought to you by my lovely friend McMommy (she recommended the Nutella stuffed French toast) and my other lovely friend VeggieMama. 

I haven’t been as ‘crafty’ as usual since I’ve been dealing with a weird sciatic nerve thing.  Thankfully these two ladies have been having some fun with their kids and were more than happy to share.

photo

Toilet paper roll + Paint + Googly Eyes = A snake and an octopus!

~McMommy


10300287_4313431690147_4323312617517726062_n

A giant cardboard box + $7 in supplies from the Dollar Tree = a new play house/flower shop/market stand for my kid.

~VeggieMama

I really need to get a move on and buy some paint for kids projects! 

Be sure to visit next Tuesday when I show you how to cut down your toddler food preparation time!

What is YOUR favorite thing to do with leftover cardboard?

~Lisa

Wednesday, August 6, 2014

Nutella Stuffed French Toast

My friend McMommy recommended that I try ‘Nutella Stuffed French Toast’ after last weeks “Cheese waffles”.  I couldn’t help myself!  So easy, so good and not terribly bad for a breakfast ‘treat’.

All you will need:

  • 4 slices of bread, crusts cut off  (one egg is enough for two ‘sandwiches’)
  • 1 egg
  • splash of vanilla
  • Nutella or generic hazelnut spread
  • Jam or preserves
  • Trusty waffle iron

IMG_3217IMG_3219

Just to clarify, raspberry jam on one side of one slice, Nutella
on one side of the other slice. Kind of like you’re making a sandwich.

IMG_3218


IMG_3220

Lay the slices of bread on the egg on the UNspread side. 
Wiggle around until it’s well coated.

IMG_3221

Cook for about 4 minutes, or until the ‘steam’ stops rising.

IMG_3223IMG_3225

These were so easy and so very tasty. The kidster went from whining to silence in 10 seconds flat!  Thanks again to McMommy who recommended that I try them, they have become a staple for our weekend family breakfast! Now I just need to find bigger bread!

Keep an eye out next week when I show what to do with that bit of leftover muffin batter!

What is YOUR favorite use for Nutella?

~Lisa

Tuesday, August 5, 2014

Hiding Cords from Kids

We were pretty lucky that our new house has an entire wall of built in bookshelves in Kidster’s room.  Super handy for storage but not so great when her monitor and Scentsy owl have cords that hang down to the wall.  I was always worried that she would pull the cord and the Scentsy would fall on her! I didn’t feel like she could play in her room ‘alone’ for very long because of that danger. After a few hints to Hubster he made a trip to Lowe’s and picked up this CordMate for about $5.
 
It’s basically a tube with a flat side covered in adhesive. He cut a bit of the end off so it could go around the bottom of the shelf.  Kidster can’t reach that shelf yet so now I feel pretty comfortable letting her play alone in her room for short periods of time.

IMG_3077
What is YOUR favorite kid safety ‘hack’?
~Lisa

Monday, August 4, 2014

Mini Corn Dogs

Last week we made Homemade Honey Nut Cheerios, a perfect snack for kids AND adults!  This week we’re making Mini Corn Dogs.  These are so yummy I ate 4 of them pretty much as soon as they came out of the oven.

I didn't use an exact recipe, simply inspiration from photos on Pinterest.  I used the packaged corn muffin mix, Jiffy brand.  They are about $.75 at any grocery store.  It’s not the most healthy thing but for a fun snack for the kids you can't go wrong.

Simply mix the batter as directed on the box, using the same temperatures and times as listed. Pour the batter in a bit less than half into your mini muffin tin.  I used my 2 teaspoon sized ‘cookie scoop’.  Cut the hot dog into about 1 inch lengths.  I actually stood up the hot dog in one of the empty parts of the tin and measured it to below the top as a guide.  Press the hot dog bit into the corn muffin batter in the tin.  I then put a bit of tiny cubes of cheese in around the hot dog, about 2 pieces. 
Bake as directed, let cool, ENJOY!
IMG_2827
Kidster isn’t a fan of the carby foods so she mostly dug out the hot dog and left the rest of the corn muffin bit for the dog but when she’s older she’ll hopefully like them, we sure did!
Next week I’ll show you how to make the ‘2 Ingredient Pancake” that seems to be so popular lately. 
What is YOUR favorite way to eat a hot dog?
~Lisa

Friday, August 1, 2014

Homemade Play Dough

Kidster is a little over 17 months (almost a year and a half in non parent time) and she’s always asking to play with the Play-Doh.  She actually says “flay” about 20 times before we finally just give in and let her play with it in her high chair.  I noticed she was taking little nibbles of it and had bits of blue goo stuck in her teeth.  Of course everyone says, “Play-Doh is non toxic!”  That being said, I’m not a fan of my kid putting it in her mouth when I’m not really sure exactly what is in it. 

Here’s a bit of history for you.  Play-Doh was originally created in the 1920’s as a wallpaper cleaner.  It was smeared on the wallpaper where the soot from the cooking stoves had caked on the walls.  Kind of along the lines of using silly putty to copy comics from the newspaper. (Do kids still do that anymore?)  It contains mineral oil and borax.  I’m not sure if Kidster ate a chunk of it that she would be feeling ok.  Toxic or not, it just doesn’t seem like a good idea for my 17 month old to be possibly eating.

I remember when we were kids my mom would ‘cook’ play dough for us.  It didn’t taste that great but I know that it wouldn’t make us sick.  I’m pretty sure she used Jell-O as a coloring or something.  This time around I didn’t have any Jell-O so I went this gel food coloring.  Not a good choice might I add, it just wasn’t as bright as I had hoped, and I used a whole tube!

In the spirit of nostalgia I used a vintage Pyrex mixing bowl, and a wooden spoon.  Pretty cool when I was playing with it it smelled just like I remembered when I was a kid.  I found the recipe at The Imagination Tree.  Be sure to subscribe to her blog! She’s pretty awesome!  She used glitter but I wasn’t sure how my dough was going to turn out and I can just imagine trying to get glitter out of a toddlers eye….  not fun.  You can be sure I’ll be adding glitter when she’s older though! Who doesn’t like glitter?

The recipe at The Imagination Tree was a pretty big batch so I halved everything. The recipe below is my halved version.  It’s certainly enough for one kid!  Be sure you have Cream of Tartar on hand because it’s a pretty major ingredient.  I talked about C.o.T. in my post Instant Apple Cider Cookies.

Ingredients:

  • 1 C plain flour (all purpose)
  • 1T vegetable oil
  • 1/4 C salt
  • 1T cream of tartar
  • Up to 2/3 C boiling water
  • Food coloring
  • *The Imagination Tree recommends glycerin to add shine but I don’t have any.
20140731_131137904_iOS

20140731_131728198_iOS

Mix the flour, salt, cream of tartar and oil in a large mixing bowl.

20140731_131806782_iOS

Add the coloring to the boiling water.  I did this as instructed and it barely added much color to the dough. 

20140731_132344922_iOS

The wooden spoon wasn’t working to mix the dough so I switched to a silicone spatula.

20140731_141503687_iOS

20140731_140437571_iOS

Kidster totally loved the dough and didn’t seem to notice the difference between the homemade kind and the Play-Doh version.  It wasn’t as colorful as I was hoping or remembered.  I think next time we will use the plain food coloring instead of the fancy pants gel stuff.  I ended up using a whole tube of gel color for a half batch of dough.  It’s a bit of a sickly green color but she enjoyed it anyway!

I have no idea what we’re going to have planned for next Fun Kid Friday but be sure to subscribe!

Which do YOU prefer: Play-Doh or Homemade?

~Lisa

Wednesday, July 30, 2014

Cheese Waffle

This week’s Waffle Iron Wednesday we’re making a cheese waffle.  It’s a basic waffle but with a cheesey twist.  Imagine a waffle and a cheese it had a little baby waffle and there you go.  The recipe makes about 12 or so waffles that I cut into segments and then stored in the refrigerator. 

I’m pretty sure I came across this recipe Cheese Waffle Recipe while trying to find new ways to use my waffle iron.  These waffles were soooo good Hubster and I had a hard time NOT eating them all in one sitting.  Keep in mind that most waffles do not reheat well in the microwave.  It’s just as easy to plug in your waffle iron, let it heat up  for a minute and then place the waffle back on the waffle iron for about a minute or two and there you go.  A perfectly crunchy reheated waffle.  I made a few adjustments because I was making these waffles for a toddler who needed a bit more healthy waffle.

  • 2 c flour (I used half flour, half brown rice cereal)
  • 2 tsp baking powder
  • 1 tsp baking soda
  • 1/2 tsp salt
  • 2 eggs
  • 1 1/2 c milk
  • 3 T vegetable or canola oil (I used coconut oil instead)
  • 1 c cheddar cheese grated
    • I also added a bit of Italian seasoning to my waffle batter just to make it a bit more ‘savory’

Now for the directions.  Keep in mind that every waffle iron is a bit different so always keep in mind the rule of thumb.  If the steam stops rising from the iron then the waffle is probably finished.

  1. Preheat waffle iron
  2. Combine the flour, powder/soda, and salt in a bowl.  Whisk together.
  3. Add the cheese and make sure to coat it with the flour mixture (this will help the cheese stay separated).  It’s really important that you make sure the cheese is really well coated with the flour mixture.  It makes a big difference and keeps the cheese from getting clumped together.
  4. In a separate bowl, whisk the eggs, milk and oil.
  5. Add the dry ingredients into the wet mixture and whisk to combine. 
  6. Pour about 1/3 c of the batter into the greased waffle iron and cook 3-5 minutes.  (I didn’t grease mine, the brand of waffle iron that I have seems to be impervious to sticky stuff…crazy.)

(Forgive the weird photos this time around.  I’m trying out a new way of posting the photos that just doesn’t want to do what I want it to. Grrrrrr. )

IMG_1458


IMG_1459

Check back next Wednesday when I show you how to make a delicious stuffed French toast (thanks to my mom friend McMommy!)

What is YOUR favorite savory breakfast dish?

~Lisa

Wednesday, July 23, 2014

Organizing Baby Photos–First Two Years

I have so many mom friends that complain about having thousands of photos of their kids on their phones.  It’s overwhelming when they realize that they have to now move thousands of photos to their computer.  It’s especially scary when your household only has one computer.  What happens if the hard drive crashes?  You lose all of those precious photos.  I’m pretty luck that Hubster is a computer fiend so we have about 3.5 computers per adult in our house right now.  He’s very serious about saving files properly and backed up properly.  I’ve had hard drives crash permanently before and it’s horrible.  They aren’t built to last forever.  They are made up of very small moving parts that get hot and sometimes the spinning mechanism just fails.  I can never stress enough to moms how important it is to invest in a $50 external hard drive and regularly copy the photos to it.  It’s also pretty great that Shutterfly and Snapfish offer unlimited storage of photos.  Getting them printed is the best way to keep them safe.

The best way to keep your child’s photos organized is to have a place already ready to dump them into.  It’s hard to try to find the right photo when you’re having to search through thousands of ‘loose’ photos on your computer.  By taking a few minutes to create ‘laundry basket’ files for your future photos it will be less of a challenge to transfer your precious photos from your phone or SD disk to your computer.

Enough preaching about externals and uploading and all that stuff.  Time to get your photos ORGANIZED!  Do a little bit every day and eventually you’ll have a wonderful record of you’re sweet baby growing up.

We’re going to use Kidster’s photo file names but feel free to change up the dates to fit your child. Kidster was born on 2/12/13 just for reference.  Also, keep in mind you can’t use the character “/” in a folder name so I used the ‘.’ instead.

So, create a folder called “Kid Name”. Open the folder and create a new folder called “Kid and Friends”.  Open THAT folder and create a few folders for various play dates or outings that have more than just a few photos.  If you have a friend that visits often, like Little Man, then you can make a whole folder just for them.   Go back to the “Kid Name” folder, open it up and create a new folder called “Kid Videos”.  So on and so forth.  I’ve listed the file names in such a way that you can see where the ‘sub-folders’ should be.  Don’t be freaked out when you open the folders later and (especially the weeks/months) the folders are rearranged a bit.  Your computer will usually put them in alphabetical order.  That means that you’ll see 2 Days Old next to 2 Weeks Old.  That’s ok!

I kept the First Holidays outside of the first year because they were special.  Second holidays will be stored in the Second Year folder. 

Kidster Fabrycated    
  Kidster and Friends  
    Kidster and Little Man
    Kidster and Other Friends
    Special Play Dates
  Kidster Videos  
    Edited Videos
  First Birthday  
    Auntie A Pre-Party
    Eating Cake
    First Birthday Snapshots
    Invitation Photos
    Opening Gifts
  First Halloween  
  First Thanksgiving  
  First Christmas  
    Visit with Santa
    Decorating The Tree
    Dinner with Family
    Opening Gifts
  First Month  
    L & D
    Birth Day
    Birth Announcement
    1 Day Old 2.13
    2 Days Old 2.14
    3 Days Old 2.15
    4 Days Old 2.16
    5 Days Old 2.17
    6 Days Old 2.18
    1 Week Old 2.19
    8 Days Old 2.20
    9 Days Old 2.21
    10 Days Old 2.22
    11 Days Old 2.23
    12 Days Old 2.24
    13 Days Old 2.25
    2 Weeks Old 2.26-3.4
    3 Weeks Old 3.5-3.11
    1 Month Old 3.12-3.18
  First Year  
    5 Weeks Old 3.19-3.25
    6 Weeks Old 3.26-4.1
    7 Weeks Old 4.2-4.11
    2 Months Old 4.12-5.11
    3 Months Old 5.12-6.11
    4 Months Old 6.12-7.11
    5 Months Old 7.12-8.11
    6 Months Old 8.12-9.11
    7 Months Old 9.12-10.11
    8 Months Old 10.12-11.11
    9 Months Old 11.12-12.11
    10 Months Old 12.12-1.11
    11 Months Old 1.12-2.11
    12 Months Old 2.12-3.11
    Portraits
  Second Year  
    13 Months Old 3.12-4.11
    14 Months Old 4.12-5.11
    15 Months Old 5.12-6.11
    16 Months Old 6.12-7.11
    17 Months Old 7.12-8.11
    18 Months Old 8.12-9.11
    19 Months Old 9.12-10.11
    20 Months Old 10.12-11.11
    21 Months Old 11.12-12.11
    22 Months Old 12.12-1.11
    23 Months Old 1.12-2.11
    Portraits
    Second Halloween
    Second Thanksgiving
    Second Christmas
    Second Birthday
  Third Year  
    Etc.

Now that you’ve created the nooks and crannies for the precious memories let’s figure out the best way to get those thousands of photos floating around into the right places.

These instructions will work for either your iPhone, SD card, camera, etc.  Whichever digital device you use.  OR even that random folder on your computer that is full of random photos.  I’m going to refer to iPhone simply because that is what I use.

First, create a folder on your desktop named “iPhone Date”.  The date will help if you’re uploading the photos from you iPhone to organize later. 

Plug your device into your computer. Open your device in the file explorer.  I never use any software to upload my photos, it makes things more complicated and a LOT less stable.   Open the file where the photos are stored. On an iPhone this is usually titled “DCIM”. Don’t fret my pet.  This folder doesn’t contain anything except Digital Camera Images.  It won’t brick your phone or delete those text messages you’ve been hanging onto.  I’m going to assume you’re using Windows 8 here.  Highlight every single photo in that folder using the RIGHT button on your mouse. Drag the photos to the desktop folder you just created.  When you let go of the mouse button it should ask if you’d like to copy the files or move the files. You want to MOVE the files.  This will remove them from the device therefore freeing up space for the next time the camera comes out to catch those amazing moments.

Now that your photos are safely nestled onto the desktop you’re going to want to get them into the right folders.  It’s not nearly as time consuming as you think.  We’ve already done the hard part. 

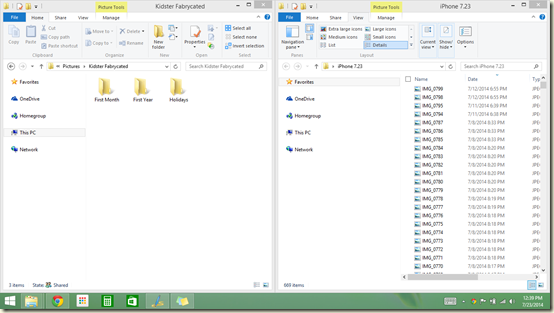
Open the “Kidster Fabrycated” (you’re kids photo folder of course).  Drag the title bar of the folder to the left corner of your screen. This should cause the folder to take up exactly half of the screen.  This is now your destination folder. Do the same thing but to the right side of the screen with the “iPhone Date” folder.  It should now take up the other half of the screen.  This in now the origin folder.  If you already have a giant folder of photos on your computer treat them as the ‘origin’ folder.   If your origin folder has photos other than of your child go ahead and create another desktop folder and drag all of the NON kid photos to that album.  You can organize those later.  Remember, if you hold down the Ctrl button you can click on all the non kid photos and it will highlight only those that you’ve selected.  Select with the right mouse button to have to the option to MOVE the photos. Now on to organizing your kid photos.

Your workspace should look like this:
image

It’s a bit fuzzy but you get the idea. 

The folder on the right may not look like this one.  It’s easy to fix.  Click on the tab “View”.  Select “Details”.  This will show you the dates of the photos.  Keep in mind I am assuming that you only have kid photos in this folder for this next part.

Click on the word Date at the top of the date column.  This will put all the photos in order of the date they were taken.  Simply highlight the photos that fit in the date range of each folder and move them to the right destination folder.  You should assume that the photos that are dated close to a holiday belong in the holiday folder.  You may have to switch between the Details view and the Icon view. 

Once you’ve moved all of the photos go ahead and delete the “iPhone Date” folder from your desktop.  Make sure it really is empty before you delete!

When you get a chance go ahead and copy the “Kidster Fabrycated” folder to your back up hard drive.  Get started uploading these folders to Snapfish or Shutterfly so you can get them printed.  Can you guess what the file box looks like that these photos live in?  You got it.  Tabbed dividers with the same folder names. 

Whenever you transfer photos to your computer in the future take a moment to create more ‘future’ folders with the dates in the folder names.  It will make it a lot easier!!

So remember, backup backup backup!!  If you have any issues please feel free to email me or put your questions in the comments.  I understand that some people just don’t have the time or the skill to get their photos organized.  I will try to help in anyway I can! 

What’s YOUR favorite way to organize photos?

~Lisa

Perfect Grilled Cheese–Every Time!

My all time favorite comfort food is grilled cheese and tomato soup.  A simple sandwich that can easily be dressed  up or enjoyed plain.  I’m pretty terrible at getting the pan the right temperature and I flip the sandwich too much.  I end up with a soggy side and a burned side when I use the usual stove method. 

Gather the usual suspects.  Bread, cheese (I prefer shredded, it heats more evenly), salt and pepper and whichever other seasonings you like.

Preheat your waffle iron on the highest setting.  Butter your bread on both sides if you like.  I don’t usually have butter that is soft enough for spreading so I skip this step.  I do love to sprinkle a bit of Italian seasonings on the inside of my sandwich. 

Once your waffle iron is preheated place your sandwich in the middle, close it up and set your timer for 4 minutes.  The general rule with any waffle in a waffle iron is when the steaming stops your waffle is ready.  I’m pretty sure it works with this too. 

I once made the mistake of using a too thick (1/4 inch) slice of cheese and WHOA! it was a cheesplosion that I was cleaning up for a good bit.  You can never really go wrong with shredded cheese or the usual American cheese slices.

The nice part of using the waffle iron is you get the little pockets of melty cheese mixed with the bits of crunchy cheese on the edges. You can add so many different things to the sandwich: bacon, ham, avocado, tomato, thinly sliced green apple, a bit of hummus (our favorite). I might try a beet and goat cheese next time just for something really different!

Kidster and Little Man will devour these sandwiches in no time!  I love that it’s easy to cut into perfect little squares.

Grilled Cheese Waffle

Check back next Wednesday when I show you how to make a savory waffle that Kidster and Little Man love!  It’s become a refrigerator staple for a healthy filling snack time.

What is YOUR favorite grilled cheese?

~Lisa

Friday, July 18, 2014

Flash Card Books

Kidster has gotten to an age where she doesn’t just chew on books.  She’s actually interested in sitting down (in my lap of course!) and reading her little board books.  I really want to make sure that she’s as well prepared for school as I can make her.  I shopped around on Amazon.com for flash cards and they all range from $4 for a box of 50 up to $50 for a whole curriculum.  Flash cards aren’t going to be the sole form of education in this house but they will certainly provide a good visual aid.  Especially when we’re eating lunch or waiting in line at the store. 

Kidster and I look at the pages and I tell her what is on them.  A letter or a number or a color, etc.  You can also use the books for faces of family members to help learn names.  It will start to get really fun when she’s telling ME what is on the page!

 Flash Card Book

Check back next week when I share a cheap ‘hack’ for loose cords in the nursery.

What is YOUR favorite educational project?

~Lisa

Wednesday, July 16, 2014

Scrambled Egg Waffle

Every Wednesday I’ll be posting a new recipe that uses the waffle iron.  You know, that weird kitchen appliance gathering dust on the top shelf of that forgotten cabinet?  It’s so easy to use and a lot less heat in the kitchen than an oven or a standing at the stove.
I love to make eggs for the kids in the morning but I get tired of making the same thing every few days. (Check out my post, Mini Cheese Omelets)  This is just as easy as the omelets but adds a bit more fun to Kidster’s breakfast.
I originally came across this recipe on Weelicious Waffle Iron Eggs.  My waffle iron is a bit larger so I doubled the recipe.
  • 2 Eggs whisked together
  • 1 tsp milk
  • 1 T shredded cheese
  • Salt and your choice of seasoning (I love herbes de province in eggs)
  • *I also added finely shredded spinach so the kids didn't know they were eating veggies.
Such simple ingredients!

IMG_2680Turn on and preheat your waffle iron.  High temperature works best. Once preheated pour mixture onto waffle iron.
IMG_2681Cook for about 4 minutes.  Eggs are super fluffy and delicious!

What is YOUR favorite waffle iron recipe?
~Lisa0

Tuesday, July 15, 2014

Natural Curls in 15 Minutes

I have long thick hair that holds a curl very well but there is just SO much of it that I avoid curling it because trying to keep the sections separated and uniform is really hard to do.  Getting the strands at the back of my head is really a pain too.  Imagine the black and white video portion of the ‘As Seen on TV” items.  “Ug! It’s Too hard!”  Well.  Rather than spending $19.99 for something that doesn’t work Abut just looks like it does through the magic of TV try this little trick.  If you have normal to thin hair you can use just a regular pony tail and not have to turn to the piggy tails. 

My baby sister was in town and babysat for Kidster last night.  I told her about my new favorite way to curl my hair.  It was an offhand comment between our QuizUp matches but she seemed to take it to heart.  She texted me at 10:49am “Tried curling my hair in piggy tails and it’s life changing.”  My response, of course, was “LOL!  I know, right?!”  To which she said, “It took like 15 minutes”.   That’s when I told her she had to be my To Neat Tuesday model.  Because all ladies need to know the super easy trick to flowing pretty curls without all the yoga moves.

She came over and spent some time teaching Kidster to blow into the whistle on her keychain and then we got to work.

Put hair up into a high pony tail for normal to thin/fine hair.  Put hair up into high piggy tails for normal to thick hair.

IMG_2989

Curl hair in one piggy tail.

IMG_2990

Curl hair in the other piggy tail.

IMG_2981

Let curls cool.  Once cool remove rubber bands.

IMG_2991

My iron wasn’t hot when we started so one side isn’t as curly as the other… My fault.  Still, looks pretty great!

IMG_2984

My baby sister, Jamster. 

IMG_2992

What is YOUR favorite hair trick?

-Lisa

Friday, July 11, 2014

Dollar Store Sensory Bag

I love the dollar store.  I can go on a shopping spree and only spend $20!  I’ve been pinning so many different dollar store kid fun ideas I figured it was time to actually DO one.  I had originally pinned the idea from this mom: Play At Home Mom.

Here’s what you’ll need:

  • Biggest bottle of hair gel available
  • Glitter
  • Food coloring or finger paint
  • Sandwich Bags or larger
  • Packing tape
  • Cardboard
 
IMG_2946

Use whatever cardboard you have around the house. 

IMG_2948

Cut to the size of the bag.  Leave space for the tape.

IMG_2949
Fill bag with gel.  The less gel the better for writing practice. Squirt in some food coloring and glitter.
IMG_2950
Tape a border around the baggie to the cardboard.
IMG_2953
Cut to fit high chair tray if needed.
IMG_2952
Kidster loves it!

What is YOUR favorite kid craft?

-Lisa

Thursday, April 17, 2014

Snapfish Hack

I am pretty organized when it comes to pictures of Kidster.  I save them in folders with the age or the occasion as the title.  I use Snapfish (this should work with Shutterfly also) to create prints or books, or even gifts for family because they claim to have ‘unlimited’ storage.  Currently, you can only upload photos to one folder at a time. 

In order to get all of the photos uploaded from different files INTO different albums I've figured out a 'hack'.

Here are the photo files from Kidster's first month.
Each folder title is her age.  Makes it a lot easier when creating books.
These websites only allow you to upload the photos.  You are not able to simply select the folder.  So you would have to select the folder and then select the pictures.  All of the photos would just be thrown into one 'album'. In order to make your online account more organized simply open a new tab and upload to a new album named the same as the folder.
 
15 Tabs? Crazy talk!
You can see here that I had 15 Snapfish tabs open.  I was in the process of organizing Kidsters photos when I realized there were duplicates all over the place with weird file names.  So I deleted them all and re-uploaded them from my computer.  It takes a little while but you end up with a much more organized online account.
Quite a bit more organized.  Be sure to select "edit album details" and change the dates so that they all line up. I'm a lot more likely to make the cute photo books and get prints of Kidster now that I know what age the photos are taken of.
 
What's YOUR favorite computer 'hack'?
 
-Lisa