Showing posts with label Organize. Show all posts

Thursday, August 7, 2014

Product Endorsement: Thirty-One Gifts

When I had my baby shower for Kidster I received a ton of Amazon gift cards.  Wooohooo! Right? I really wanted a super cute, super handy diaper bag.  BUT Hubster seemed to feel left out of the Amazon spending spree and he had mentioned that he really liked Fisher Price FastFinder Diaper Backpack.  So I bought it.  He wasn’t nearly as excited about it as I had hoped.  After all I had ‘sacrificed’ my dream diaper bag Soho Soren The Owl 6 in 1!  I guess in my addled pregnant mind I had transformed my Hubster into a squealing bag and shoe loving lady person.  What man gets excited about a DIAPER BAG?  None.  I’ve dealt with the bag as long as I could, 18 months actually.  It’s super handy, don’t get me wrong.  Kidster will use it as an overnight bag for years I’m sure.  Lots of zippered pockets, etc.  I spent the next year and half packing and repacking all manner of bags that I would find around the house or were given to me.  Nothing really soothed the frantic mom lady in my head who could never find her wallet on a play date!

When you’re out and about with toddlers it’s much different than with infants.  Toddlers want things, they WANT things NOW!  I really loved the Soho Soren because it had a ton of ‘quick grab’ pockets on the outside.  Kind of like a mom toolbelt.  Well ladies and gentlemen I’ve finally purchased the diaper bag of my dreams.  This is actually something that not just mom type people would want either.  It would be perfect for going to outdoor festivals, the beach, tradeshows, or traveling out of town.

My friend, McMommy, is a consultant for Thirty-One Gifts and I recently hosted an online only (no scrambling to clean the house, make nibblies or take a shower!) Facebook ‘party’ for her products.  I really liked the catalog and figured I might get a bit of a discount or free stuff.  Wowie wowie! I spent less than $60 and got three amazing bags!  An owl lunch thermal, a really awesome mom purse and the super amazing awesome Zip Top Organizing Tote.  This thing is serious. 

I took it on it’s maiden voyage to the Barnes and Noble story time, lunch and playground trip.  It was like the heavens opened and Jeff Buckley was singing “Hallelujah”.  It’s the little things that make a mom happy right?

Here are few photos of the diaper bag of wonderfulness:

IMG_7214What is that you might ask?  It’s a travel container for Kidster’s “bbbboooon”.  Also known as spoons.  Oh, and a bib of course.  That pocket to the right is holding my iPhone 5c quite nicely too.


IMG_7215

Those are Little Man’s shoes hanging out on the mesh pocket on the end.  Pretty freaking cute huh?  He never needs them since most toddler playgrounds are “No Shoes”.  But at least we have them when we need them.


IMG_7216

Hoo Hoo is that? That is Kidsters totally NOT spill proof owl straw cup. I don’t have to worry about that now since it has it’s own little place to hang out. 


My sunglasses are hiding on the left and Little Man’s cup is on the right.

IMG_7217

That brings us back around to the other side.  Aren’t Kidsters star Mary Jane’s the cutest?  She loves them.  She’s always trying to put them on.  Getting pretty good at it too. 


IMG_7219

But wait!  There’s more!  The inside has a vinyl layer so leaks are super easy to clean.  I’ve got diapers, wipes, diaper trash bags, wallet, cash, and a cute owl thermal lunch bag with snacks being kept cold.

So enough about this fantastic diaper bag ‘o’ happiness.  I just wanted to share! If you are interested in maybe hosting an online only Thirty-One Gifts party so you can get great products that make life a bit easier be sure to message me so I can give you McMommy’s ‘deets’ as the kids are saying these days.

What is YOUR favorite “Tupperware Party” type product?

~Lisa

Wednesday, July 23, 2014

Organizing Baby Photos–First Two Years

I have so many mom friends that complain about having thousands of photos of their kids on their phones.  It’s overwhelming when they realize that they have to now move thousands of photos to their computer.  It’s especially scary when your household only has one computer.  What happens if the hard drive crashes?  You lose all of those precious photos.  I’m pretty luck that Hubster is a computer fiend so we have about 3.5 computers per adult in our house right now.  He’s very serious about saving files properly and backed up properly.  I’ve had hard drives crash permanently before and it’s horrible.  They aren’t built to last forever.  They are made up of very small moving parts that get hot and sometimes the spinning mechanism just fails.  I can never stress enough to moms how important it is to invest in a $50 external hard drive and regularly copy the photos to it.  It’s also pretty great that Shutterfly and Snapfish offer unlimited storage of photos.  Getting them printed is the best way to keep them safe.

The best way to keep your child’s photos organized is to have a place already ready to dump them into.  It’s hard to try to find the right photo when you’re having to search through thousands of ‘loose’ photos on your computer.  By taking a few minutes to create ‘laundry basket’ files for your future photos it will be less of a challenge to transfer your precious photos from your phone or SD disk to your computer.

Enough preaching about externals and uploading and all that stuff.  Time to get your photos ORGANIZED!  Do a little bit every day and eventually you’ll have a wonderful record of you’re sweet baby growing up.

We’re going to use Kidster’s photo file names but feel free to change up the dates to fit your child. Kidster was born on 2/12/13 just for reference.  Also, keep in mind you can’t use the character “/” in a folder name so I used the ‘.’ instead.

So, create a folder called “Kid Name”. Open the folder and create a new folder called “Kid and Friends”.  Open THAT folder and create a few folders for various play dates or outings that have more than just a few photos.  If you have a friend that visits often, like Little Man, then you can make a whole folder just for them.   Go back to the “Kid Name” folder, open it up and create a new folder called “Kid Videos”.  So on and so forth.  I’ve listed the file names in such a way that you can see where the ‘sub-folders’ should be.  Don’t be freaked out when you open the folders later and (especially the weeks/months) the folders are rearranged a bit.  Your computer will usually put them in alphabetical order.  That means that you’ll see 2 Days Old next to 2 Weeks Old.  That’s ok!

I kept the First Holidays outside of the first year because they were special.  Second holidays will be stored in the Second Year folder. 

Kidster Fabrycated    
  Kidster and Friends  
    Kidster and Little Man
    Kidster and Other Friends
    Special Play Dates
  Kidster Videos  
    Edited Videos
  First Birthday  
    Auntie A Pre-Party
    Eating Cake
    First Birthday Snapshots
    Invitation Photos
    Opening Gifts
  First Halloween  
  First Thanksgiving  
  First Christmas  
    Visit with Santa
    Decorating The Tree
    Dinner with Family
    Opening Gifts
  First Month  
    L & D
    Birth Day
    Birth Announcement
    1 Day Old 2.13
    2 Days Old 2.14
    3 Days Old 2.15
    4 Days Old 2.16
    5 Days Old 2.17
    6 Days Old 2.18
    1 Week Old 2.19
    8 Days Old 2.20
    9 Days Old 2.21
    10 Days Old 2.22
    11 Days Old 2.23
    12 Days Old 2.24
    13 Days Old 2.25
    2 Weeks Old 2.26-3.4
    3 Weeks Old 3.5-3.11
    1 Month Old 3.12-3.18
  First Year  
    5 Weeks Old 3.19-3.25
    6 Weeks Old 3.26-4.1
    7 Weeks Old 4.2-4.11
    2 Months Old 4.12-5.11
    3 Months Old 5.12-6.11
    4 Months Old 6.12-7.11
    5 Months Old 7.12-8.11
    6 Months Old 8.12-9.11
    7 Months Old 9.12-10.11
    8 Months Old 10.12-11.11
    9 Months Old 11.12-12.11
    10 Months Old 12.12-1.11
    11 Months Old 1.12-2.11
    12 Months Old 2.12-3.11
    Portraits
  Second Year  
    13 Months Old 3.12-4.11
    14 Months Old 4.12-5.11
    15 Months Old 5.12-6.11
    16 Months Old 6.12-7.11
    17 Months Old 7.12-8.11
    18 Months Old 8.12-9.11
    19 Months Old 9.12-10.11
    20 Months Old 10.12-11.11
    21 Months Old 11.12-12.11
    22 Months Old 12.12-1.11
    23 Months Old 1.12-2.11
    Portraits
    Second Halloween
    Second Thanksgiving
    Second Christmas
    Second Birthday
  Third Year  
    Etc.

Now that you’ve created the nooks and crannies for the precious memories let’s figure out the best way to get those thousands of photos floating around into the right places.

These instructions will work for either your iPhone, SD card, camera, etc.  Whichever digital device you use.  OR even that random folder on your computer that is full of random photos.  I’m going to refer to iPhone simply because that is what I use.

First, create a folder on your desktop named “iPhone Date”.  The date will help if you’re uploading the photos from you iPhone to organize later. 

Plug your device into your computer. Open your device in the file explorer.  I never use any software to upload my photos, it makes things more complicated and a LOT less stable.   Open the file where the photos are stored. On an iPhone this is usually titled “DCIM”. Don’t fret my pet.  This folder doesn’t contain anything except Digital Camera Images.  It won’t brick your phone or delete those text messages you’ve been hanging onto.  I’m going to assume you’re using Windows 8 here.  Highlight every single photo in that folder using the RIGHT button on your mouse. Drag the photos to the desktop folder you just created.  When you let go of the mouse button it should ask if you’d like to copy the files or move the files. You want to MOVE the files.  This will remove them from the device therefore freeing up space for the next time the camera comes out to catch those amazing moments.

Now that your photos are safely nestled onto the desktop you’re going to want to get them into the right folders.  It’s not nearly as time consuming as you think.  We’ve already done the hard part. 

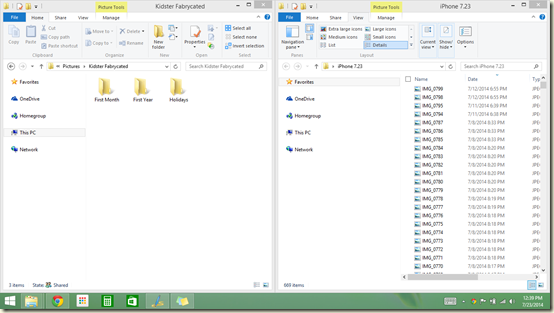
Open the “Kidster Fabrycated” (you’re kids photo folder of course).  Drag the title bar of the folder to the left corner of your screen. This should cause the folder to take up exactly half of the screen.  This is now your destination folder. Do the same thing but to the right side of the screen with the “iPhone Date” folder.  It should now take up the other half of the screen.  This in now the origin folder.  If you already have a giant folder of photos on your computer treat them as the ‘origin’ folder.   If your origin folder has photos other than of your child go ahead and create another desktop folder and drag all of the NON kid photos to that album.  You can organize those later.  Remember, if you hold down the Ctrl button you can click on all the non kid photos and it will highlight only those that you’ve selected.  Select with the right mouse button to have to the option to MOVE the photos. Now on to organizing your kid photos.

Your workspace should look like this:
image

It’s a bit fuzzy but you get the idea. 

The folder on the right may not look like this one.  It’s easy to fix.  Click on the tab “View”.  Select “Details”.  This will show you the dates of the photos.  Keep in mind I am assuming that you only have kid photos in this folder for this next part.

Click on the word Date at the top of the date column.  This will put all the photos in order of the date they were taken.  Simply highlight the photos that fit in the date range of each folder and move them to the right destination folder.  You should assume that the photos that are dated close to a holiday belong in the holiday folder.  You may have to switch between the Details view and the Icon view. 

Once you’ve moved all of the photos go ahead and delete the “iPhone Date” folder from your desktop.  Make sure it really is empty before you delete!

When you get a chance go ahead and copy the “Kidster Fabrycated” folder to your back up hard drive.  Get started uploading these folders to Snapfish or Shutterfly so you can get them printed.  Can you guess what the file box looks like that these photos live in?  You got it.  Tabbed dividers with the same folder names. 

Whenever you transfer photos to your computer in the future take a moment to create more ‘future’ folders with the dates in the folder names.  It will make it a lot easier!!

So remember, backup backup backup!!  If you have any issues please feel free to email me or put your questions in the comments.  I understand that some people just don’t have the time or the skill to get their photos organized.  I will try to help in anyway I can! 

What’s YOUR favorite way to organize photos?

~Lisa

Friday, March 28, 2014

Dish Mitt

As a stay at home mom I'm doing dishes and laundry all the time.  It seems like the time it takes to fill and empty the dishwasher I could have done them all by hand!  I've started getting into the habit of filling the sink in the morning with hot soapy water and just tossing in dirty dishes as they happen, which is a lot!

I don't like using sponges because they seem a little germy to me.  The dish brushes are great but they seem to get full of bits and pieces.  I"m already a little weird about wet food in the sink and yucky stuff like that so it just doesn't seem like a sanitary idea.

My kitchen is a pretty low toxin place.  I use non-toxic dishwasher soap, dish washing soap (yes, there is a difference!).  I use vinegar in the rinse aid container in the dishwasher and tend to clean the countertops with a hydrogen peroxide based cleaner. I also use cloths to wipe the kids hands and faces and generally to wipe down everything.  I have a small laundry basket in the kitchen that I toss the cloths into and wash about 3 times a week.  It's from the dollar store and not very solid so the cloths tend to try pretty quickly.

And that brings me to washing dishes with a wash cloth.  All of the cloths that we have for that purpose are way too big.  About 10"x10".  I feel like there is so much extra fabric flopping around that I spend the time trying to get the cloth under control!

I was staring at this giant cloth yesterday and it hit me.  Cut them into smaller squares.  So 4 5"x5" squares were cut.  Then I realized that I could sew them together and make a dish mitt!  After fighting with my sewing machine (both of the threads ran out at the same time!) I made this handy dandy little mitt.  If my machine had been more helpful it wouldn't have taken more than a few minutes.

I also realized too late that I only needed to cut them into 2 rectangles and sew up one side but hey, this is an 'on the fly' project!
Cut, turn inside out, sew along two sides. 

Flip right side out!

It sits on the faucet perfectly and dries really well.

What is YOUR favorite dish tool?

Tuesday, February 18, 2014

Drawer Clean Up!

Junk drawers are the worst.  I have or rather HAD two of them in my kitchen.  We moved in with a 4 month old and things kind of just got tossed into places.  Then more stuff got tossed onto the other stuff and now it's just a giant mess.

A quick visit to the dollar store helped me out quite a bit!  The ice cube trays were perfect for the little screws and nuts and bolts and whatever little bits that were laying around the drawer.  I'm pretty happy with the way it turned out and now when I need something I know exactly where it is!!


"Honey have you seen my work glove?"

"It's where it belongs, in the garage, and NOT in the drawer!"

What part of your home do you wish would just get cleaned out already?

Thursday, February 6, 2014

Kitchen Help

I've been on a mission to organize the spaces in my home where I spend the most time.  Starting with the kitchen.  I nanny for an 8 month old little boy and I have my own 12 month old Evelyn.  Needless to say, they eat...All. The. Time.

Now that they are digging in more often than they are having a liquid lunch I have plenty of dirty bibs, cloths and towels.  They would end up on a pile next to the laundry room door and I would scoop them up at the end of the day and throw them into the larger laundry basket in the laundry room.  Bad Idea.  This just meant that I had a larger basket of laundry hiding behind a closed door.

Easy solution!  I visited the local Dollar Tree and purchased a small laundry basket to store under the high chair.  I can toss bibs, towels and wash cloths in there and at the end of the day I only have a small load to wash.  No yucky wet towels at the bottom of the basket from a few days ago.
Not to big, not to small!  Just right!

Thursday, October 18, 2012

Getting It Together!

I've got so many things I have to do and so many things I want to do. Then there are all the little things that need to be done but not until next week or next month. Being ME and loving to organize I went ahead and used a simple template on MS Publisher to create a calendar for the next few months.  Not something to keep in a binder but to hang on my office/nursery door and keep me up to date.

Things I put on my calendar:

  • Upcoming baby shower
  • Reminders to buy gifts for baby shower
  • Halloween plans
  • Exercise goals/ plans
  • How many weeks I am
  • Reminders to mail birthday cards
  • Reminders to work on Belly Book
  • Reminders to work on blog
  • Reminders for social events, etc.

I feel like I have so many things that are just dangerously floating around in this preggo brain of mine and I don't want to forget a thing!  Hopefully this will help me stay on track for when the baby comes. I found out while planning my wedding not to leave anything to my memory, just write it down, make a list. Nothing set in stone but at least it will keep me going steady and who doesn't like feeling a little less stressed?

My October calendar


How do you stay on track?

XOXO
-Lisa

Tuesday, October 16, 2012

Laundry Tip

Being pregnant means some days I've got oodles of energy and others I just really want to sleep through the day.  But as they say, Laundry Waits for No Woman!

Our new apartment came equipped with a HUGE washer and dryer set which I love.  Our old apartment had nada, which of course, meant weekly trips to the laundromat.  Now let me tell you, laundry and few beers at the icehouse next door was kind of fun.  But now that alcohol is off limits it's just a chore!

I got into a habit here with our lovely in house appliances of throwing laundry in at night, drying and folding the next day. The only problem with that is the towels just couldn't wait to be dried and would end up smelly by the time it came to dry!

My current trend and hopefully, new habit, is to avoid filling the washer to capacity and just hoping that I have enough energy to finish the task.  One small wash/dry/fold a night and I think soon we will be on our way to having clean and clean smelling clothes and towels.

Wish me luck!

What are your laundry habits?  Anything I should try?

XOXO
-Lisa

Sunday, October 14, 2012

Little By Little

It's a rainy day and I've decided to start organizing different parts of our life, starting with the grocery list.  We end up spending too much and buying things we don't always need.  "Honey, I think we already have 3 cans of diced tomatoes..."

I downloaded a terrific grocery list from Free Grocery List Template .   It's really easy to personalize so I found our recent shopping list / receipt and just added the things we buy most often.  We do tend to make the same things every week and this will help keep up from forgetting things!


I went ahead and printed 3 copies to keep in the recipe binder in the kitchen.  It'll be hard to train hubby to use it but I'm sure it will make my shopping life easier!

Saturday, September 22, 2012

Gender Reveal Party

We had a lot of fun at our Gender Reveal Party!  Zoltan and I found out we were having a girl on Monday and had to keep it a secret for a whole week!  The grandma's were both at the ultrasound so they knew and they still did a great job keeping the secret!  Neither one of them could make it to the party so it made it special for them to be able to find out with us.  They are both first time grandma's and so very happy to be involved with a lot of milestones.

(I think the baby enjoyed the party, she's kicking me as I type this.  Just little popcorn kicks but wonderful!)

I worked on the planning of the party for about two weeks. My sister in law helped brave the wilds of Costco for the refreshments (hummus, chips, fruit bowl, all the yummy stuff!)

Thanks to Pinterest I had so many great ideas that it made the planning, well, fun!

I decided on a pink and blue theme and purchased crepe paper, plates, napkins etc from the local party store.  My first stop though was the local dollar store.  Sooo much to be found!   A few 'projects' I did to add personality to the party:


  •  One of my favorite table decorations were two hurricane glasses with Hershey's kisses and ribbon around them.  Just make the table look sparkly!  I am kicking myself for not taking a picture of the table!
  • Cut out 5x7 pictures of the ultrasounds from the anatomy scan and strung them on twine on the mantle using tiny colorful plastic clothspins.
  • Plastic baby bottle banks for 'donations' with printed signs.
  • Chalkboard outside "It's almost time to see!  Will it be a bouncing baby boy or a pretty little she?"


I created the invitations using MS Publisher and printed them on a blank invitation card from Target. (The scanner is a bit wonky but you get the idea!)


I created a banner with simple paper and my printer!

I put this on the mantle with the little boy and little girl clothes pins for everyone who wasn't "Wearing Their Guess".
I also baked and frosted a cake.  I bought food coloring to dye the cake but totally forgot until the cake was baked!  So half pink and half blue frosting instead!  I used tiny chocolate chips for the "?". The little decorations around the edge were plastic trinkets from the dollar store. 


Using a plastic baby bottle and raffle tickets we asked for donations toward "Future Wedding Fund (Girl)" or "Future Bailout Money (Boy)".  Everyone got one guess and were able to purchase additional tickets!  We gave away a $20 Amazon Gift Card which I simply bought online and printed on my computer.  Super easy!  (Grandpa won the gift card and gave it back to us a bit later because he 'didn't know how to use it'!)

I printed this out on my computer and put it into a $1 store frame.


We used helium to blow up pink balloons and then put them in a trash bag to make it easier.  Readers:  You MUST super inflate the balloons or they don't "POP" out of the box.  My sister in law wanted the little balloons to look like bubbles, great in theory but they weren't floaty enough.  It worked out anyway and everyone saw we were having a GIRL!


I thought it was a girl so I wore pink and hubby thought it was a boy so he wore blue!


Just to make sure we would get pictures of some of our more outgoing friends we had a photobooth set up.  I hung crepe paper from the wall, cut out some 'props' and set up the camera on a tripod.  Point and shoot!
Just be sure to turn off AutoFocus because it'll focus on the person who presses the button.


After the party I pulled down the ultrasounds and used them for the thank you cards!  I printed about 15 of these, cut them out and glued them to the back.  I used the .xls spreadsheet for the invitations and just mailed them out.  The whole thank you project took only about 30 minutes!


We had a fantastic party and really made all our friends and family feel special!  

What are some of YOUR favorite Gender Reveal announcements?

XOXO
-Lisa