Tuesday, December 4, 2012

A New Etsy Favorite! More the Merrier Design

One of my new favorite Etsy shops is MoreTheMerrier!  When you want more than just the usual (*ahem* boring) free online printables go visit Natalie at her shop!

nashaw


Unique party & wedding invitations, save the dates, 

and paper party decor galore! At More the Merrier, we love paper 

& we love parties! 

We customize our designs to create the perfect printables for your event! Once you love it, we email you the digital PDF or JPG file. You can have that file printed at home, your favorite local print shop, or online (I love catprint.com) as many times as you'd like!

Best Soup Ever!

Let me start by saying I pulled this recipe off of Pinterest.  I made it to feed the ladies of a party brainstorming meeting.  The hubs kind of took over while I was making it and he's made it about 5 times since then!!  It's a simple, inexpensive soup that just tastes better after a few days.  

We call it Italian Bean and Pasta Soup but the original recipe is Sausage and Bean Soup with Pasta.


A few notes before I divulge the recipe of this delicious soup (which I made for my cookie exchange party, and ate the last of the leftovers today!).   We use red kidney beans, we don't drain the sausage and we use small shells pasta.  Other than that, we're pretty true to the recipe.  Man it's so good!


Ingredients:
  • 1 cup dried cannellini or cellini beans or 1 15-ounce can of any beans you like, drained
  • 1 pound ground sausage, turkey or pork
  • 1/2 medium onion, diced
  • 1/2 medium carrot, diced
  • 3 tablespoons olive oil 
  • 2 garlic cloves, minced
  • 1 15-ounce can diced tomatoes 
  • 6 to 8 cups chicken broth
  • 1 teaspoon dried thyme
  • 1 bay leaf
  • salt and pepper 
  • 1 cup ditalini pasta, or any small pasta
  • grated Parmigiano Reggiano cheese 
Instructions:
If using dried beans, place them in a pot, cover with cold water and let soak for several hours or overnight. Drain.
In a large pot, brown the sausage.  Remove from pot.  If there is a lot of fat left in the pot, pour this out but do not wipe out pot.  Add onion, carrot and olive oil and saute for 5 minutes until soft.  Add garlic and saute about a minute more.  Add the tomatoes, 6 cups of the chicken broth, thyme, bay leaf, some salt and pepper, the drained beans (*this is the point to puree the beans if you want to) and the sausage and cover the pot. Cook for an hour over low heat, at a gentle simmer.
If using dried beans, check for doneness at this point.  (If using canned beans, add the pasta now.)  If the beans are not soft enough, cover the pot again and cook for another 30 minutes or until the beans are soft. Add the pasta and cook, uncovered, until the pasta is tender.  Check the seasoning and add more salt and pepper to taste.  If the soup is too thick for your liking, you can add more chicken broth.
Serve with grated cheese on top and an extra drizzle of olive oil.
What's YOUR favorite soup?
Next on Fabrycated Mom: Decorating for Thanksgiving for under $20
XOXO
-Lisa

First Wedding Anniversary

I've been getting a bit behind with my blog due to the third trimester tireds!  The holidays are certainly in full swing and I've been pooped!  I've certainly been cooking and crafting though so it's time to get caught up!

Our first wedding anniversary was November 11 and we had a great weekend.  Hubs planned outings that involved yummy food and culture.  The opera followed by a declicous steak at an upscale steakhouse.  I made a paper/photo collage that I'm quite proud of.

The first anniversary is traditionally paper.  I began looking online for different ideas somewhere around September.  I found a few cute things that I could have dropped $30 on but really, could have made myself.

So that's what I did!

Using a few of my Snapfish free prints and a $12 picture frame I found online at Target I think I did a great job at being frugal AND creative!  Go me!

Here is the finished project:

It spells out "SOULMATES".  Also, an engagement photo, a wedding photo and the green box soon became the lyrics to our first dance song.

I took the photos of the letters throughout the span of a few weeks.  Each letter is from a place that is close to our heart as a couple. I used MS Paint to write on the frame what measurements I would need for each photo specifically so I could make sure crop appropriately. (I was not going to let pregnant brain ruin this!)


 I then uploaded them to Snapfish and waited for the prints to arrive.

It was pretty easy to place the photos in the corresponding spaces using double sided tape and the paper that came in the frame.

This was one home made gift that I was pretty proud of and hubs totally appreciated.

What did YOU do for your first wedding anniversary?

Next time: Italian Bean and Pasta Soup

XOXO
-Lisa


Tuesday, November 6, 2012

Swedish Rye Bread!

(I just noticed that most of my posts have an exclamation point in the title.  I'm always so excited when something goes right that I just have to convey those feelings with punctuation.)

Swedish Rye bread has quite a few memories attached for my siblings and I.  Our grandmother was an immigrant from Sweden to Texas and stuck to her Swedish roots.  There were little plaques and maps around her house in Swedish.  She also adopted much of the Texas culture.  Thus, Swedish rye bread and gravy.  A delicious, terribly not healthy, breakfast consisting of fried Swedish rye bread smothered in cream or country gravy.  So yummy!  I've never seen it on a menu, heard of anyone else making or even made it myself.  It's never to late to rekindle a tradition though, right?

I'm actually nibbling on a slice of it right now, it's that good.  I bet it would be good with butter but I'm just too lazy. I know for a fact that it does pair quite well with a mug of apple cider!


Place 10 ounces of water, 1 teaspoon salt, 2 tablespoons white sugar, and 1/4 cup Brer Rabbit light molasses in a glass bowl and microwave for 90 seconds. (Molasses smells terrible!!!  I had no idea!)


Remove, stir ingredients, and place in bread maker pan. (The original recipe left out the part about  the water in the bowl and it turned out fine, but was really hard to work with!)

Place 1/2 cup rye flour and 2 3/4 cup white bread flour on top of liquids.  Make a hole in the center of flour and place 1 1/2 teaspoon bread machine yeast in it.  

Set your controls for 1 1/2 pound loaf and medium crust (I set my machine to Whole Wheat).


The finished product as soon as it was finished!  I couldn't wait to cut into it and it was steaming when I cut it open.  A yummy crusty bread with a bit of sweetness.

What's your favorite bread machine recipe?

Next time on Fabrycated Mom: First Wedding Anniversary Gift 

XOXO
-Lisa


Sunday, November 4, 2012

Pumpkin Seeds, Finally!

Daylight savings time ending has given me a whole extra hour to enjoy my Sunday.  Sundays are always over too quickly aren't they?  

Halloween has come and gone and I'm just now getting around to roasting my pumpkin seeds.  I've kept them in a plastic container in the refrigerator for a bit and so they are still fresh. I've really just been holding out for the perfect recipe.  I wanted savory, then I wanted sweet, then I wanted spicy and couldn't make up my mind!!  And then I found it.  A recipe for Sweet, Spicy and Savory Pumpkin Seeds!  It couldn't have been easier and oh boy they are delicious!  I was actually making them more for the hubby because he likes spicy stuff but I can't keep my hands off of them!


Let's get this party started!

So, to start:
  • 2 cups cleaned, washed and dried pumpkin seeds
  • 2 tablespoons unsalted butter (I used salted, no difference that I noticed)
  • 3 tablespoons brown sugar
  • 1 1/2 teaspoons kosher salt
  • 1 tablespoon chopped fresh rosemary (I only had the dried, again, no difference)
  • 1/4 teaspoon cayenne pepper
  • 1/4 teaspoon black pepper


Your friendly ingredients, watch out for cayenne though!!
 Directions:
  • Preheat oven to 350 degrees
  • In a medium saucepan over medium-low heat, melt the butter and then stir in the brown sugar, salt, rosemary, cinnamon, cayenne and black peppers.
  • Stir for 2-3 minutes until the sugar has mostly melted (no joke, I didn't stir long enough and the sugar just clumped when I put the seeds in so use a timer if you need to.)
  • Remove from heat, and stir in the pumpkin seeds.

Smells so good!
  • Spread on a well-greased cookie sheet.   Some recipes will say to use foil for easy clean up but it will be a terror to get the seeds off.  I didn't even grease my cookie sheet, just used the non stick type and stirred, A LOT. 
Seeds!  As far as the eye can see!

  •  Bake for 15-20 minutes, stirring 2-3 times during baking.  KEEP A CLOSE EYE!  They will burn, baby burn!  Once they look like this, they are ready! 

After much stirring and waiting, Voila!
My first batch is almost gone and we have friends coming over tonight for baked ribs so I'm sure they'll help us finished them off!

What's your favorite pumpkin seed recipe?

Next on Fabrycated Mom: Swedish Rye Bread (in a bread machine!)

Be sure to subscribe, I'll be giving away an Amazon Gift card within the next few weeks!

XOXO
-Lisa


Earl Grey Tea Cookies!

I have a love affair with Earl Grey Tea.  There's just something about the blend of herbs and black tea that really give me that cozy feeling in the morning and after work!

I was enjoying a cup at work the other day and was inspired to look up a recipe for Earl Grey Tea cookies. My friend Natalie (see her blog here: Soiree Bliss Event Planner Blog ) had an amazing cookie exchange party last year and I'm trying to get a jump on my cookie entry!  I'm shameless!


Speaking of shameless, be sure to subscribe to Fabrycated Mom so you don't miss the "Mac and Cheese Amazon Gift Card Giveaway"!

The cookies are a shortbread style with the tea mixed in.  Very fitting for a High Tea, I would assume! They came out perfectly and I will certainly be making them again.  I told my husband, "Any cookie I can make in the food processor is a cookie I love!"  Very little clean up and super simple for something so delicate!

I cheated a bit, this photo is from Google Images.  BUT mine really looked like this! We ate them before I could take their picture...mmmmmm

Start with: 2 cups all purpose flour, 2 tablespoons loose Earl Grey tea leaves (I used 6 bags of the Twinning), 1/2 teaspoon salt, 3/4 cup powdered sugar, 1 teaspoon pure vanilla extract and 2 sticks of room temperature butter

Pulse together flour, tea and salt until the tea is just spotted throughout the flour.  
Add the powdered sugar, vanilla and butter.  Pulse together just until a dough is formed.

Place dough on a sheet of plastic wrap and roll into a log.  You have to work with it a bit but who doesn't love rolling dough into a log? Roll the log about 2 1/2 inches in diameter.  Tightly twist each end and chill in refrigerator for 30 minutes.  Use a bag of rice to keep the round shape. Slice the log into 1/3 inch thick disks.  lace on parchment or silpat lined baking sheets, 2 inches apart.  Bake at 375 degrees until the edges are just brown, about 12 minutes.  Let cool on sheets for 5 minutes then transfer to wire racks (or paper towels in my house) and cool to room temperature. 

The best part about these cookies is the crumbly buttery texture and the light Earl Grey flavor.  I had a few, OK four, before bed and didn't notice any effect from the caffeine.   I made about 12 and put the roll into the freezer to make again when I have the desire.

How have I gone my whole life without making shortbread or even 'icebox' style cookies?  So easy and so delicious?  These are certainly a winner and will be made year round.  Is it wrong to dip them into a lovely steaming cup of Earl Grey tea?  Methinks not!

What are you favorite shortbread or icebox style cookies?

Next on Fabrycated Mom: Roasted Pumpkin Seeds, Perfect Ribs and (hopefully) Swedish Rye Bread

XOXO
-Lisa


Mac Daddy Mac and Cheese

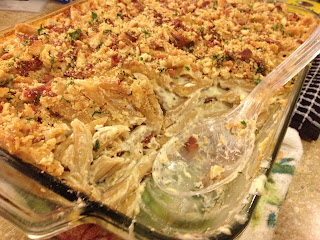
Hubby decided to 'practice' making a sinful mac and cheese yesterday in preparation for Thanksgiving. Although it turned out great it really wasn't what we where thinking we wanted for Thanksgiving.  This is more of a fancy pants mac than a down home traditional mac and cheese.  The topping, OH the Topping! We will be using this for all manner of things down the road.

My husband cooks in a very organized fashion so I couldn't help but take a picture! The full recipe is at the bottom.

Everything ready to go, just waiting for the pasta to boil!

The recipe called for "1 pound penne pasta".  We used 2 boxes.  I would recommend next time only one, maybe one and half so there is more sauce per noodle.  We also used whole wheat pasta, next time, go for the regular.

The sauce is so thick it just sticks to the pasta!


Real life mac and cheese, complete with bacon!

Served with a rotisserie chicken! Yummy!

This came from Mac Daddy Mac and Cheese


Mac Daddy Mac n' Cheese

Courtesy Guy Fieri May 2008
Prep Time:
20 min
Inactive Prep Time:
1 hr 0 min
Cook Time:
50 min
Level:
Easy
Serves:
8 servings

Ingredients

  • 2 shallots, peeled  (we only used one, Texan shallots are HUGE!)
  • cloves garlic
  • 1 teaspoon olive oil
  • 3 pieces bacon, diced, cooked, reserving 1 tablespoon bacon fat
  • 2 tablespoons flour
  • 4 cups heavy cream (we only had one small container of heavy cream so we used 2 cups half and half, turned out fine.)
  • 1 teaspoon chopped fresh thyme
  • 1 cup shredded pepper jack cheese
  • 2 cups shredded cheddar cheese
  • Salt and freshly ground black pepper
  • 1 pound penne pasta, cooked  (we don't have a reliable food scale so we used 2 boxes, I recommend 1 1/2 next time)
  • 1/2 cup Panko bread crumbs
  • 2 tbsp. melted butter
  • 2 tablespoons chopped fresh parsley

Directions

Preheat oven to 350 degrees F. Place shallots and garlic in a small aluminum foil pouch and drizzle with olive oil. Roast 20 to 30 minutes or until tender. Remove from foil and chop. In a large saute pan, reheat reserved bacon fat over medium heat. Add roasted shallot and garlic and saute for 1 minute. Add flour and stir for 1 minute. Whisk in heavy cream and thyme. Reduce by a third. Stir in cheeses until melted, creamy and thickened. Season to taste with salt and pepper. Remove from heat and gently stir in pasta. Place in a 9X13casserole dish. In a small bowl, mix together diced bacon, bread crumbs, butter and parsley. Top Mac n Cheese with Panko mixture and bake uncovered at same heat until bubbling and lightly browned on top, 20 to 25 minutes.

Dinner was delicious and we will make this again for gatherings certainly, a bit of work but the second time around will be faster I'm sure!  
What's your favorite sinful mac and cheese? 

Next on Fabrycated Mom: Earl Grey Tea Cookies

XOXO
-Lisa


Wednesday, October 31, 2012

Happy Halloween!

Happy Halloween!

Halloween is my favorite holiday.  Get dressed up, hand out candy and see all the cute costumes for kids, what's not to love?  Next Halloween we'll have an 8 month old and I saw the cutest 'sock monkey' outfit for a baby.

My friend Natalie (see her blog here: Soiree Bliss Event Planner Blog ) had a small Hand Out Candy party at her house this evening and it was a great idea!  Here are the ingredients for a successful Hand Out Candy party for those of you who will be, well, Handing Out Candy next year!


  • Food for friends
    • She made a Curried Butternut Squash Soup with French bread (yum!)
    • Recipe for the Curried Butternut Squash Soup
      • 2 Tbs unsalted butter
      • 1/2 medium yellow onion, chopped
      • 1 large carrot, peeled and sliced
      • 1 1/2 lbs butternut squash, peeled, seeded, and cubed
      • 1 medium russet potato, peeled and cubed
      • 1 tsp ground ginger
      • 1 tsp ground cinnamon
      • 1 1/2 Tbs curry powder
      • 1 tsp salt
      • 2 cups chicken stock
      • 1/2 cup milk (low fat or fat-free is fine)
      • 1/2 cup heavy cream (optional)
      • 1 tsp honey
      • 1/2 tsp paprika
      • Freshly ground black pepper
      • Sour cream or Greek yogurt, for garnish
      Melt the butter in a large saucepan or Dutch oven over medium-high heat.  Add the onion and carrot and saute over medium heat for about 3 minutes, or until the onions begin to soften.  Add the squash, potato, ginger, cinnamon, curry powder, and salt.  Saute for 2 minutes.  Add the stock, milk, cream, honey, and paprika and bring the soup to a boil.  Decrease the heat, cover the pot, and simmer the soup over low heat for about 45 minutes, or until the vegetables are soft.  Add black pepper to taste.  If the soup seems too thick, add more milk or chicken stock. 

      Optional: Working in batches, puree the soup in a blender or food processor until smooth.  Or mash the soup in the pot so there was still some texture.  Or eat  it as is.   Serve hot with a dollop of sour cream or Greek yogurt on top.

      Also, here is a picture play-by-play: Photo Play by Play for Curried Butternut Squash Soup
    • Have yummy sweet snacks for the friends 
      • We referred to this treat as "Ghost Poop" but it's generally referred to as "White Trash"
      • Ingredients:

        • 6 cups assorted unsweetened cereals (we used rice and wheat Chex)
        • 3 cups salted nuts
        • 2 cups pretzel sticks
        • 1 1/2 cups m&m's
        • 1 1/2 cups candy corn
        • 2 - 12 ounce packages (4 cups) white chocolate chips

        Preparation:

        Cover large surface with waxed or parchment paper. In a large mixing bowl, mix together cereals, nuts and pretzels. In a microwavable bowl, melt white chocolate chips in microwave on 70 percent power for 1 minute. Stir. If necessary, continue to microwave in 10 to 15 second increments until melted. Stir melted chocolate into cereal mixture until well coated. Quickly spread out over covered surface. Once cooled, break-up and store in resealable containers or bags.
  • Buy a bag of candy every time you go to the store for a few weeks ahead of time so you have enough
  • Have a few Halloween movies on hand to watch before the kiddos get there
  • Have each guest bring a bag of their favorite candy to add to the 'stash'
  • Have a few cute masks or hats or crowns for guests to wear
We hung out on the porch for about 2 hours and handed out candy to all the cute kids.  We had so much fun and I really felt like I got to experience Halloween the 'old fashioned' way!

Casey and Leah masked up and ready to go!

My DIY pregnant costume and Katie the Rabbit!
What's your favorite Halloween tradition?

Next on Fabrycated Mom:  Are we roasting the pumpkin seeds now?

XOXO
-Lisa

Tuesday, October 30, 2012

Lisa's Chicken Ooopsala

Yesterday hubby decided to put together a bike so I decided to try making dinner.  I knew I had chicken and mushrooms and carrots.  So I started flipping through my handy dandy cookbook, "Favorite Brand Names Best-Loved Recipes".  I bought it for $3 at Half Priced Books!  This is the cover if you wondering:
There was a recipe for "Chicken Bistro" and another one for "Chicken Marsala".  I didn't have some of the ingredients for one and the other so I combined them!  Hence the name "Ooopsala".

I'm terrible with meat cooking in general, I have to have hubby check to see if it's done most of the time.  I was in one of those rare moods and really wanted to make him something yummy so I figured I would suck it up and use my 'women's intuition' to figure it out myself. Keep in mind that at 6 months pregnant my women's intuition has turned into preggo brain and I get distracted / stressed out easily!

Here is the recipe:

Ingredients

2 chicken breasts filleted in half
1 tbls butter
1 tsp thyme
1/2 tsp paprika
1/2 tsp salt
1 cup sliced carrots
1 cup sliced fresh mushrooms
4 large peeled cloves of garlic, cut in half
2 x 1/3 cup chicken broth (1/3 extra if you need it)
1/3 cup Marsala cooking wine (or leftover red wine)
  • Sprinkle seasonings onto one side of the chicken. 
  • Melt butter in large skillet on medium high heat.
  • Place chicken seasonings side down and cook for 5 minutes.  Do not turn over.
  • After 5 minutes turn over the chicken
  • Place mushrooms, carrots, garlic, 1/3 chicken broth and wine in pan (add the extra 1/3 cup chicken broth if you desire)
  • Bring to a boil then simmer for 15-20 minutes until the chicken is done
    •    If the chicken is cooked all the way through but the carrots are not, remove chicken, keep warm, continue simmering vegetables.
  • Serve over rice or pasta
Only about 350 each serving too. 

It just won't turn upside down!  Pretty yummy though!

Hubby's plate.  He must have hated it huh?
Next time: Finally roast those pumpkin seeds?

What's your favorite cookbook?

XOXO
-Lisa

Monday, October 29, 2012

Failed Muffins!

This post started out as How To where I walk you through making yummy muffins.  Well, I'm not going to lie to you, I have no business walking anyone through a brightly lit straight hallway since even I couldn't get these right!  It was a total 'user error' on my part, I admit, and I will be making them again, without changing a thing from the original recipe.  It was a pleasant way to pass the time before my friend Katie came over to make us lamb burgers before we watched the newest episode of Walking Dead.

I have had the same two packets of instant oatmeal in my pantry for a bit of time now and I wanted muffins.  I had recently purchased my first muffin tin and was raring to find a great, easy recipe for muffins.  (The muffin in a mug recipe was, well, not good.)

I came across this recipe online: Brown Sugar Instant Oatmeal Muffin


Here is the photo of the muffins they supposedly made
Looks so innocent and tasty and trustworthy huh?  HA!  Ok, I'll be nice.  They actually do look pretty good, which is why I wrote down the recipe.

Here's their recipe:


 Directions
  1. Preheat oven to 400 degrees F (200 degrees C). Grease 12 muffin cups.
  2. Combine 3 tablespoons flour, brown sugar, and cinnamon in a small bowl. Use a pastry blender or two knives to cut in the butter until the mixture resembles coarse crumbs. Reserve.
  3. Combine 1 3/4 cup flour, white sugar, baking powder, salt, and the instant oatmeal in a large bowl. Make a well in the center of the flour mixture; pour in the egg, milk, and oil. Stir just until moistened. Spoon batter into prepared muffin cups, filling each 2/3 full. Evenly sprinkle streusel topping over muffins.
  4. Bake in preheated oven until toothpick inserted in center of muffin comes out clean, about 15 minutes. Cool on wire rack for 5 minutes before serving.


Seems pretty simple and delicious, if you followed the recipe.  I didn't.  

My muffins before baking time
This is what I did wrong, and I vow to you never to do it again!

  • I got tired of using the knives for the streusel topping and used the food processor instead.  A bit too fine of a topping, but that actually worked out in the end. 
  • Everything was going great until the egg, oil and milk.  That's where it went horribly wrong. 
    • I used Egg Beaters instead of egg
    • I used non-fat milk, may not have been the best idea
    • I used applesauce instead of oil
And the straw that broke the Quakers back was the paper cups.  I thought I was going to be so cute and bring homemade muffins to work in my cute little paper cups.  Did I spray with Pam? Nope.  I figured paper cups would come right off. 

They didn't. 

Trying to eat my muffins (pardon the expression...) was a mess.  I basically had to forsake 1/4 of each muffin to the cute and useless paper cups.  I made 12 muffins that tastes like a dense, bland, sponge with giant bubbles and a hint of paper.  I made Katie and Myles eat one and I ate two (I was hungry.) and threw the rest away.   This recipe as not seen the last of me!  I will make them again!  

What is your favorite muffin recipe?

Next on Fabrycated Mom: Simple Baby Shower Gift Tag

XOXO
-Lisa